Next and Continue Dont Work in Gdb
We at Johny's Software Lab LLC are experts in performance. If performance is in any way concern in your software project, feel free to contact us.
Link to GDB cheatsheet.
If you've been developing even for a short time on Linux or other embedded devices you've surely come across GDB, the GNU Debugger. At beginning the tool might seem counterintuitive, but after a while you get used to it. But getting used to it should not be enough for a motivated developer because this tools has much to offer.
I am sure that by now you are familiar with the most important command that GDB offers: c (continue), n (next), b (break), s (step), bt (backtrace) and fr (frame). In this article we will talk about commands and features of GDB that are less known but very useful in your daily struggle with buggy code. So let's start.
Table Of Contents
- Use the right compiler switches
- Useful GDB commands
- gdb –args
- Stop GDB at the first line of main()
- Command: until
- Command: ignore
- Commands: info locals && bt full
- Command: bt number
- Command: command
- Dynamic printf
- Watchpoints
- Command: thread apply all
- Execute commands from a script
- Command: save breakpoints
- Log gdb output to a file
- Text User Interface
- Recording
- .gdbinit
- Debugging tips
- Repeat program through GDB until failure
- Debugging memory corruption with record and watchpoints
- Final Words
- Further Read
Use the right compiler switches
If you ever debugged optimized code, you know that during debugging values often get mixed up or are missing or the program doesn't follow a regular path but instead jumps around etc. This happens because compilers "rewrite" your code to make it faster, but this makes debugging harder.
For some of these issues there are no easy solutions, but that doesn't mean you can't do anything. Here are a few tips on how to make your debugging experience with optimized code better. These tips may work or may not work and it might happen that you will need to lower your optimization level in order to be able fully to debug the program.
- Debug support for optimized code is still work in progress on both GCC and CLANG, so for the best debugging experience use the newest version of these tools as possible. It is not a bad idea to also use the newest version of GDB as well, since there are many new features and bug fixes to make your work more pleasant.
- In software development, debug builds are normally compiled using
-gswitch which enables debug symbols in the compiler output. However, if you are often seeing "value optimized out" you should enable additional debugging symbols with-ggdb3instead of-gswitch. This will allow you to debug macros within GDB as well. - Dwarf is a debugging file format many tools use to keep debugging information in binary files. If your compiler supports it, it is advisable to specify
-dwarf-5switch to your compiler in order to use the newest version of DWARF. - Enable
-fno-omit-frame-pointeron your compiler. This will enable you to see the full call stack, otherwise smaller functions might be missing. This option has minimal performance impact on x86-64 and should be used always because it allows simpler debugging on the field. - If you are still having problems with debugging optimized code, decrease optimization level from 3 or 2 to optimization level g. Optimization level g (
-Og) turns on only those optimizations that do not interfere with debugging.
Useful GDB commands
Here is a list of few useful commands that will make work with GDB more efficient.
gdb –args
There is a failure in your code, and the command line is complicated. e.g ./my_program --arg1 value1 arg2 value 2. Just prefix the line with gdb --args and the program will start through gdb.
gdb --args ./my_program --arg1 value1 arg2 value 2 You can even pass environment variables to the program, e.g:
ENV_VARIABLE=value gdb --args ./my_program --arg1 value1 arg2 value 2 Stop GDB at the first line of main()
You started up your gdb instance using gdb --args and now you would like to set up a breakpoint. The problem is that, since no library is loaded except for your program, you will not be able to do that.
Solution is to use start command. Command start just puts a temporary breakpoint on the first line of main and runs the program. Program stops at the first line of main and there you can insert your breakpoints easier since all libraries have already been loaded.
Reading symbols from ./linked_list_test...done. (gdb) start Temporary breakpoint 1 at 0x40d770: file linked_list_test.cpp, line 76. Starting program: /home/ivica/johnysswlab/2020-05-datacaching/linked_list_test Temporary breakpoint 1, main (argc=1, argv=0x7fffffffe1a8) at linked_list_test.cpp:76 76 int main(int argc, char* argv[]) { (gdb) Command: until
Until is a useful little command. If your program is paused in the debugger, and you want to move it forward a few lines, instead of running next several times, type until line_number. It will move the debugger to that particular line in the source code.
Temporary breakpoint 1, main (argc=1, argv=0x7fffffffe1a8) at linked_list_test.cpp:76 76 int main(int argc, char* argv[]) { (gdb) until 90 main (argc=<optimized out>, argv=<optimized out>) at linked_list_test.cpp:90 90 run_test<4, iterations, 4>(my_array); (gdb) Command: ignore
When you are debugging a problem, it happens often that the problem reproduces after a breakpoint is hit exact number of times. For example, problem appears in the 1,072nd invocation of function test_fun().
You can use ignore command to quickly reproduce this. Load your program into GDB and then:
(gdb) break linked_list.h:111 Breakpoint 2 at 0x407538: linked_list.h:111. (12 locations) (gdb) ignore 2 200 Will ignore next 200 crossings of breakpoint 2. Ignore command skips the breakpoint for the given number of times.
If you want to see how many times breakpoint is hit use info breakpoints, e.g:
(gdb) ignore 2 200 Will ignore next 200 crossings of breakpoint 2. ... (gdb) info b Num Type Disp Enb Address What 2 breakpoint keep y <MULTIPLE> breakpoint already hit 201 times Commands: info locals && bt full
If you are looking for a value of local variable, you can print the value of all local variables in the current thread using info locals:
(gdb) info locals current = 0x611100 block_empty = <optimized out> next = <optimized out> prev = 0x0 If you want to print local variables in backtrace command, use bt full:
(gdb) bt full #0 linked_list<test_struct<4>, 4>::remove_if<run_test(std::vector<int>&) [with int linked_list_values = 4; int iterations = 1; int struct_size = 4]::<lambda(const test_struct<4>&)> > (this=0x7fffffffe050, condition=<optimized out>) at linked_list.h:116 current = 0x611100 block_empty = <optimized out> next = <optimized out> prev = 0x0 #1 run_test<4, 1, 4> (my_array=std::vector of length 50000, capacity 50000 = {...}) at linked_list_test.cpp:66 i = <optimized out> my_list = {begin = 0x611100, end = 0x6f86d0} header = "Node size = 4|struct size = 4|" len = 50000 ... Command: bt number
If backtrace contains a lot of functions you can print the N innermost frames by specifying a number after bt command. Example:
(gdb) bt 5 #0 0x000000306e08987b in memcpy () from /lib64/libc.so.6 #1 0x00000000009c4798 in load_input_picture (pic_arg=0x3371fa0, s=0x1ee7b40) at libavcodec/mpegvideo_enc.c:1257 #2 ff_mpv_encode_picture (avctx=0x1ee7710, pkt=0x2788bb0, pic_arg=0x3371fa0, got_packet=0x7fffffffcf6c) at libavcodec/mpegvideo_enc.c:1830 #3 0x000000000082ccea in avcodec_encode_video2 (avctx=avctx@entry=0x1ee7710, avpkt=0x2788bb0, frame=frame@entry=0x3371fa0, got_packet_ptr=got_packet_ptr@entry=0x7fffffffcf6c) at libavcodec/encode.c:296 #4 0x000000000082cfb5 in do_encode (avctx=0x1ee7710, frame=0x3371fa0, got_packet=0x7fffffffcf6c) at libavcodec/encode.c:365 (More stack frames follow...) Command: command
When defining a breakpoint you can use the command command to specify custom commands to execute when the breakpoint is hit. For example, if you want to print a content of a variable len and continue, this is the way to do it:
(gdb) break linked_list_test.cpp:52 Breakpoint 2 at 0x407455: linked_list_test.cpp:52. (12 locations) (gdb) command 2 Type commands for breakpoint(s) 2, one per line. End with a line saying just "end". >print len >continue >end Dynamic printf
GDB offers an ability to add printfs to the program without a need to recompile it. This feature is called dynamic printfs. Internally it is a breakpoint paired with printf and continue commands. It looks like this:
dprintf location, formatting-string, expr1, expr2, ... Location specifies a location where you want to put your dprintf (similar to location in break command). Formatting-string, expr1, expr2 etc. have the same meaning as in case of printf. Here is an example to put it into more perspective:
(gdb) dprintf 145, "First element is %d\n", array_regular[0] Dprintf 2 at 0x55555555690a: file sorting.cpp, line 145. ... First element is 0 Watchpoints
Watchpoints allow you to stop your program when a memory location or a structure is modified. You do it like this:
(gdb) watch name-of-the-variable Example:
(gdb) watch current Watchpoint 3: current (gdb) c Continuing. Watchpoint 3: current Old value = (linked_list<test_struct<4>, 2>::linked_list_node *) 0x85530e0 New value = (linked_list<test_struct<4>, 2>::linked_list_node *) 0x86706c0 linked_list<test_struct<4>, 2>::remove_if<void run_test<2, 1, 4>(std::vector<int, std::allocator<int> >&)::{lambda(test_struct<4> const&)#1}>(void run_test<2, 1, 4>(std::vector<int, std::allocator<int> >&)::{lambda(test_struct<4> const&)#1}&&) (this=0x7ffffffee260, condition=...) at linked_list.h:116 116 while (current != nullptr) { (gdb) GDB is smart and if you are watching a variable that is stack allocated, its address will be different in different calls of the function. GDB will take care of that. If you want to disable this behavior, then use:
watch -l name-of-the-variable Command: thread apply all
If you are working in a multithreaded environment, you are for sure familiar with command info threads that list all the threads in the system. But you can do more. Command thread apply all cmd will apply cmd for each thread in the process, for example:
thread apply all bt // prints stack backtrace for each thread thread apply all print $pc // prints value of $pc for each thread If you are debugging some code with someone over e-mail, the first thing you should ask them is output of thread apply all bt full. This will print stack backtraces of all threads with all local variables, a very useful tool for investigation.
Execute commands from a script
You can keep GDB commands in a script file, and then execute them when needed. You can create a script file to connect to a remote target, configure GDB, restore breakpoints etc. The commands in a script file are exactly the same as commands on the gdb command line.
You can specify the script name when you are starting GDB using execute script switch (-x).
$ gdb -x gdb-script.txt --args ./my_program You can also execute a GDB script inside GDB using source command.
(gdb) source gdb-script.txt Command: save breakpoints
Newer versions of GDB have a command that saves all breakpoints, watchpoints etc. to a file.
(gdb) save breakpoints bp.txt Saved to file 'bp.txt'. This will save all the breakpoints to a file specified as an argument. If you want to restore your breakpoints in a later GDB session use source.
(gdb) source bp.txt Breakpoint 2 at 0x402d2e: file sorting.cpp, line 124. Breakpoint 3 at 0x403515: file sorting.cpp, line 144. You can also load the breakpoints using the execute script switch (-x) on the command line, like this:
$ gdb -x bp.txt --args ./sorting ... Reading symbols from ./sorting... Breakpoint 1 at 0x184c: file sorting.cpp, line 125. Breakpoint 2 at 0x290a: file sorting.cpp, line 148. (gdb) Log gdb output to a file
You can log your debug session to a file and later review it when debugging is over or send it someone by e-mail. Just run set logging on to log everything to a file called gdb.txt. More information about logging are available here.
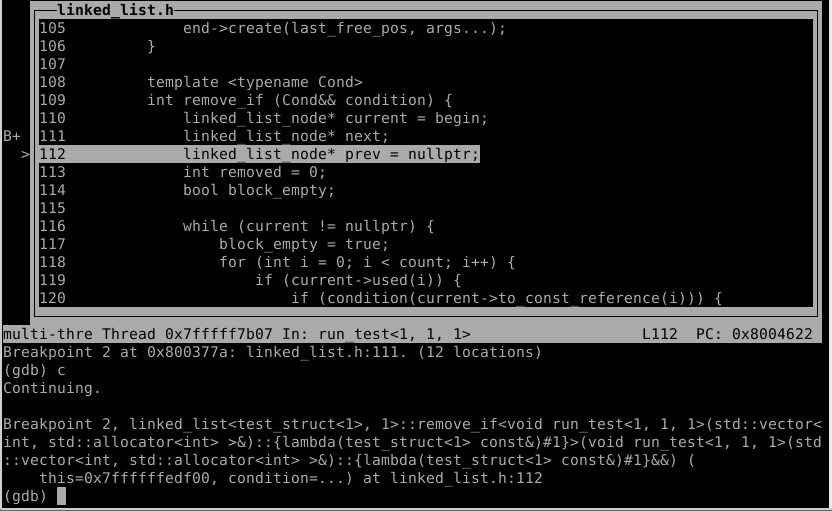
Text User Interface
GDB comes with a less known feature called Text User Interface (TUI). Hit Ctrl + X + A (or type -) and your gdb will divide the screen in two parts, on the top part of the screen you can see the code you are debugging, on the bottom part of the screen you can type gdb commands. This is a huge improvement to using list to actually see what code are you debugging!
Hit Ctrl + X + 2 and you will get multiple windows: source code, assembly code, registers etc. Ctrl + X + 1 will bring back a single window. To exit TUI hit Ctr + X + A again.
While in TUI inspecting code, you can use commands up and down to move up and down the call stack instead of using frame 0, frame 1 etc.
TUI is not perfect. Up and down keys don't work as you expected, instead of listing through the commands they will move the code window up and down. Use Ctrl + P and Ctr + N to move to previous or next command. Use Ctrl + B and Ctrl + F to move left and right. Your screen might mess up if your program produces large amount of output. Hit Ctrl + L to refresh it.
Recording
One of the cool features introduced recently to GBD is recording. When you type record on the GDB command line, GDB will start to record all the executed instructions. What this means is that you will be able to cancel the effect of already executed instructions, or simply put run your program backwards.
A bug is only a symptom of the problem, the source of the problem happened some time ago. Depending on the type of the bug, the source can be closer to the symptom or further back in time. What developer is doing while debugging is getting closer and closer to the source of the problem. Reverse execution allows the programmer to get back to a previous point of time without a need to restart the program.
GDB recording offers set of new commands that allows you to reverse-run your program. These are:
- reverse-continue ('rc') — Continue program being debugged but run it in reverse.
- reverse-finish — Execute backward until just before the selected stack frame is called.
- reverse-next ('rn') — Step program backward, proceeding through subroutine calls.
- reverse-nexti ('rni') — Step backward one instruction, but proceed through called subroutines.
- reverse-step ('rs') — Step program backward until it reaches the beginning of a previous source line.
- reverse-stepi — Step backward exactly one instruction
- set exec-direction (forward/reverse) — Set direction of execution. All subsequent execution commands (continue, step, until etc.) will run the program being debugged in the selected direction.
The problem with recording in GDB is that is is extremely slow. Recording works by trapping every instruction, observing what it is doing and then saving that this information to a recording buffer. But this makes your program run many times slower.
In order to benefit from recording, you need to issue the record command in the right moment. If you issue the command to early, you will need to wait a lot of time for the problem to reproduce because recording is slow . If you issue the record command to late, you will skip the buggy code.
Recording is a very cool feature, but the way it is implemented now it's difficult to use. Figuring out when to start the recording is not an easy task. There are some tools that do recording much better, such as rr, PANDA or Undo LiveRecorder (payed) and I plant to write about them in the future. I know for example that rr integrates with GDB and everything mentioned here also applies to rr.
Complete instructions on how to use GBD recording feature are available here.
.gdbinit
GDB executes all the commands from a file called .gdbinit at startup. The file should be located in the user's home directory which allows you to have the same set of commands executed when GDB is loaded.
You can use this file to customize GDB to your needs.: configure gdb, define custom commands, log all output to a file etc. Here is an example of a simple .gdbinit file (remove comments before pasting the commands):
set history save on # saves the command history between sessions set pagination off # if the screen is too long, you won't # need to press y to scroll it set print pretty on # displays values of classes, structs etc. nicely set confirm off # you won't need to confirm commands You can also find on the internet many useful commands to put into your .gdbinit file to ease your debugging. For example, pretty printer for STL containers can be found here.
You can also have .gdbinit per directory. GDB loads the content of this file if this file is present in the same directory where GDB is started. This can be used to execute commands before GDB starts that are useful for one particular project, e.g. connect to a remote gdbserver instance.
Debugging tips
Repeat program through GDB until failure
Occasionally the bug doesn't reproduce every time, instead you will need to run the program several times to reproduce it. To repeat program until failure (with optional recording), you will set up a breakpoint at exit function (called when system exit) and instruct it to restart the program.
(gdb) start ... Temporary breakpoint 1, main (argc=1, argv=0x7fffffffdec8) at linked_list_test.cpp:80 80 int main(int argc, char* argv[]) { (gdb) set pagination off (gdb) break exit Breakpoint 2 at 0x7ffff7267120 (gdb) command 2 Type commands for breakpoint(s) 2, one per line. End with a line saying just "end". >run >end (gdb) c Continuing. ... The program will continue to execute in loop until the program crashes or the user interrupts the execution with Ctrl + C.
Debugging memory corruption with record and watchpoints
Watchpoints are extremely useful for debugging memory corruption when paired with recording. The idea is to run your program through GDB with recording on and when a memory corruption happens your program will stop. It should be easy to figure out which memory address got corrupted. Then you need to set up a watchpoint on that address and then reverse-continue it. When the watchpoint hits, you will see the line that corrupts your memory.
(gdb) set pagination off (gdb) start Temporary breakpoint 1 at 0x4005a0: file /usr/include/x86_64-linux-gnu/bits/stdio2.h, line 104. Starting program: /home/ivica/Projects/johnysswlab/a.out Temporary breakpoint 1, main () at test.c:9 9 printf("\n i = %d \n", i); (gdb) record (gdb) c ... (gdb) watch *(long**) 0x7fffffffddd8 Hardware watchpoint 2: *(long**) 0x7fffffffddd8 (gdb) reverse-continue ... Above is a shortened description of what needs to be done. Unfortunately, getting the full address that needs to be watched requires some skill and a full description of this technique would require a whole article. Luckily there is a live demonstration of this technique available here.
Final Words
Even though there are many visual debuggers that are easier to use, GDB is a very powerful debugger with many features, and the more you know about it the more you will love it. It is omnipresent and is simple to configure, and although it takes time to master it, the effort will definitely pay off many times.
Like what you are reading? Follow us on LinkedIn or Twitter and get notified as soon as new content becomes available.
Need help with software performance? Contact us!
Further Read
https://www.sourceware.org/gdb/news/reversible.html
"Give me 15 minutes and I'll change your view of GDB"
Writing a new GDB command
"CppCon 2018: Greg Law "Debugging Linux C++""
Source: https://johnysswlab.com/gdb-a-quick-guide-to-make-your-debugging-easier/
0 Response to "Next and Continue Dont Work in Gdb"
Enregistrer un commentaire